- Home
- All Occasion
- Hello Kitty Birthday Cake
Hello Kitty Birthday Cake
by Michele Owen
(Beachwood, Ohio)
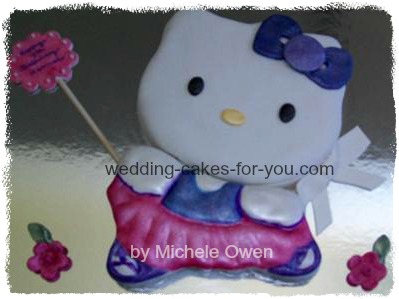
My client requested a Hello Kitty Birthday Cake for her granddaughter's seventh birthday. Having never carved or sculpted a cake before I expressed doubt in doing so. She wouldn't take no for an answer!
First Step Fondant Decorations
My first step was making the fondant decorations; the bow, eyes, and nose. I let them dry and painted with luster dust.
Online Cake Decorating Resources
After doing some research I found a video on how to make the face using a template, pinning it to the cake and cutting around it. I found a template online and enlarged it.
Tip
My client had given me a picture of the Hello Kitty her granddaughter wanted. I scanned it to my computer, enlarged it, and voila I had a template for the body! I decided it would be easier to cut the shape in two parts.
Baking And Carving The Cake
I baked a half sheet cake (chocolate) and froze it. When it came time to carve, holding my breath, I cut the cake in half and made the head and then the body. Keeping the cake cold helped reduce the crumbs.
Frosting And Fondant
I frosted the head and placed it on the cake board angling it like the picture, and covered it with fondant. I proceeded with her body but this time frosted it and covered it in fondant before lining it up below her head. I placed the template over her body and using a gum paste veining tool, made an impression of her ballet dress, hands, and feet. I then attached the decorations with piping gel.
Out Of My Comfort Zone
The last step was to color her dress. I painted it with luster dust mixed with clear vanilla extract. When I stood back and looked at it I couldn't believe I created this.
I will be forever grateful to Maxine for pushing me out of my comfort zone! Her granddaughter Hannah was beside herself when she saw it. This is why I do this.
Comments for Hello Kitty Birthday Cake
|
||
|
||
|
||
|
||
|
||
|
||
This article was printed from Wedding-Cakes-For-You.com
