- Home
- All Occasion
- Decorating A Cake- 50 Lessons in how not to panic
Decorating A Cake- 50 Lessons in how not to panic
by Meris Stansbury
(Arlington, VA, US)

Front
Decorating A Cake
Unfortunately, my real job (in D.C.) is as an online editor for a small education publication. But oh, how I would love to spend those hours in a kitchen! (I’m 27, so I figure I have time to figure this job stuff out.)
I make little things for potlucks in my office, and a coworker got wind that I was also starting to play with “decorating cakes,” instead of just cupcakes and quiches.
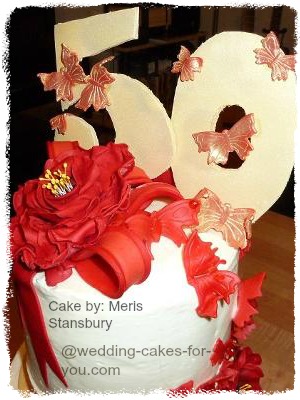
I was so flattered that she asked, because the cake was for her 50th birthday, and that’s no tiny event! It’s also the first cake I would make for someone who requested one from me, and my first large tiered cake.
The Cake Flavors
I gave her a list of all the cake flavors I could do, as well as fillings, and she decided on a three-tiered cake: first tier (10-in.) yellow cake with strawberry mousse, second tier (8-in.) just plain yellow cake, and third tier (6-in) lemon cake with raspberry mousse. The icing was Italian meringue buttercream.
Decorations
She also wanted red and gold decorations and “some kind of ribbon.” Since it’s summer, I decided to go for flowers and butterflies. The gold ribbon is an ivory fondant ribbon (pre-made) and sprayed edible gold.
The butterflies are Fondarific’s red buttercream fondant, and the flowers are Satin Ice’s gum paste tinted red. The actual ‘50’ is foam core, sprayed edible gold. That, and the flower stamens, are the only non-edible parts.
My Inspiration
I started by looking at pics online and getting inspiration. Let me say this now: every cake recipe and icing recipe I use is from Wedding Cakes for You. These are the best cakes I’ve ever made, and not just because they’re good for tiers! The Italian meringue buttercream is also some of the lightest, tastiest and easiest I’ve ever made.
Decorations were designed by brainstorming. I went to my favorite place to buy decorations, Global Sugar Art and browsed all the categories during my lunch hours. Just by browsing I got the idea for the edible sugar crystals on the butterflies, and found my butterfly cutters, the edible spray gold, the pre-made ribbon, etc.
Cake Supports
Then came the support. I was browsing Wedding Cakes for You when I read about cake stands and support systems. Brilliant! I ordered a three-piece special price set from Cake Stackers because the last thing I wanted was a wobbly, lopsided cake!
Planning
I decided to use Wedding Cakes for You’s suggested time frame for making your own wedding cake with a few tweaks.
The cake was for Saturday, so a week prior (Saturday before deadline) I began making all of my cake decorations with gum paste and fondant. Monday night I put the finishing touches on these decorations. Tuesday night I baked and froze my cakes. Wednesday night I had to re-bake some cakes and then freeze. Thursday night I made the mousse fillings and crumb coated, and I took Friday off work to put the final icing coat on the cakes, assemble them on the cake stackers and put them in the fridge. Saturday I applied all the decorations and my coworker came to pick up the cake in the evening.
Near Disasters
If it were only as simple as that! To start, I must have incorrectly measured some cake ingredients because the lemon cakes came out terribly. (I was making 1 10-in, 2 8-in, and 2 6-in cakes). I was also so tired that at 2 a.m., and having to get up the next morning for work at 5:30 a.m., I stuck an 8-in vanilla in the freezer without letting it cool.
So Wednesday night, I baked my lemon cakes and one vanilla cake again, letting them cool completely this time, and they came out perfectly. Crisis #1 averted.
Next, I tried to make my mousses but the consistency was too runny--I ended up doubling the whipping cream amounts provided on this site and then refrigerating before using. But after filling and freezing the cakes, I realized I had forgotten to use buttercream dams! So I had to let them sit out, then take out some mousse, then make some buttercream, and then dam and re-freeze. Crisis #2 averted.
Then I tried to crumb coat and realized I didn’t have enough butter to make more buttercream to continue crumb-coating the top lemon tier. Ugh. Off to the grocery store at 10 p.m. This is also where I got hit by a car in the parking lot as a woman who was texting was also reversing full-speed. Strangely enough, the butter I was carrying absorbed the impact (got smashed in the process), and I was fine except for some minor hip bruising, but it did mean I had to go back and buy more butter! Crisis #3-4 averted.
Next, when I tried to stack my cakes on the cake stackers, the cakes were too firm from being in the fridge and wouldn’t slide down the supports. So after spending 2 hours putting the final icings on my cakes, I had to press down on the tops of the cakes and ruin the icing to get the cakes to slide down evenly on the metal supports. Time to re-ice the cakes! Crisis #5 averted.
The next crisis happened because my apt. is so small I can’t open the fridge door completely because the oven is in the way (yes, the kitchen is that small). So after spending an hour jamming the oven to a new angle and re-arranging my fridge shelving, I put the cake in the fridge, only to have a bowl of jello from the top fridge rack, fall from the rack in the back space and onto my cake—jello, bowl and all. Oh man. Time to re-ice the cake…again. Crisis #6 averted.
Then the ‘50’ decoration I had originally made from hardened and dried fondant cracked and broke. Thank goodness I had some left-over foam core from a presentation. Crisis #7 averted.
Finally, I had to figure out how to get the buttercream from melting during the trip from my apt. to my coworker’s car in 100-degree weather. The answer: walk quickly and use arm strength you never thought you had. Crisis # 8 semi-averted.
Tip
There are tons of tips, but here’s the one that’s the most important: get some sleep. Half of my problems stemmed from not paying attention because I was rushing and tired: miscalculating cake ingredients, forgetting important steps, not thinking logically (hard cakes will not go easily onto metal supports; hard, thick fondant will crack if not structurally sound; hot cakes in the freezer will be soggy when defrosted), and letting cakes get bombarded by jello bombs. So, please, BE RESTED!
Other Tips:
Start planning how much flour, sugar, butter, vanilla extract, etc., you need way in advance if you’re making a tiered cake. A calculator is useful…as is a boyfriend who’s good with math and can tell you how many feet of pre-made fondant ribbon you need to wrap your cakes’ circumferences.
Learn from YouTube videos-I learned how to dye gum paste, make flowers, and make the big rose-peony thing on the top of the cake by looking at YouTube videos. If you want to know how to make the rose-peony flower, go to Inspired By Michelle. She has some great cake decorating tips and tricks. For instance, she uses a 12-in. mitre square you can buy at hardware stores to smooth out her icing and ganache. (I bought one and it works wonderfully!)
Edible gold spray cans are tinier than their picture. If you’re going to spray a lot of decorations, get 2-3 cans at least!
Save up your money—designing cakes is not for the frugal.
Americolor gel colors are the best, because they will not run after hours and hours.
Get a cake turntable—it’s worth the investment for how easy it is to ice your cakes.
Put your fondant and gum paste decorations in airtight containers. This way, they’ll keep for weeks, and up to months.
Be careful with your fondant and gum paste decorations. If you press too hard on them once dry, they will crack and break.
And finally—be FEARLESS. Everything seems daunting when you’ve had no formal training, but as long as you have the will…and lots of supplies…there’s a way. And don’t be upset if things don’t work out exactly as you planned (I could never get Michelle’s rose-peonies to look like she did—my petals wouldn’t ruffle like hers), just improvise and have fun. It will all work out in the end! If I can do it, so can you!
So in conclusion to this epic, my co-worker had a wonderful party and a wonderful cake for her many, many guests. I didn’t charge her, as this was the first cake I had ever made for someone (I used some savings to buy everything) but it was worth it, just to know that: A. I can do it! And B. I made someone happy!
Here is a link to my baking blog, where people can ask questions and find some fun recipes: Baking Things
Comments for Decorating A Cake- 50 Lessons in how not to panic
|
||
|
||
|
||
|
||
|
||
|
||
|
||
|
||
|
||
|
||
|
||
|
||
|
||
|
||
|
||
|
||
|
||
|
||
|
||
|
||
This article was printed from Wedding-Cakes-For-You.com

